Create a WordPress admin user account from Cpanel
This quick guide will show you an easy way to create a new WordPress admin user account via cPanel or your file management through your host provider. But why would this we necessary?
Why use CPanel to create a WordPress admin user account?
I was recently contracted to perform website maintenance for a client who had allowed their website to become outdated and hadn’t kept up with their preventative maintenance schedule. Outdated plugins and outdated themes created vulnerabilities and the website was hacked in a cyber attack. The hacker had deleted my client’s WordPress admin user account and prevented them from being able to access their website. Over time more and more plugins required updates and eventually, the user interface started to break.
I have been contacted numerous times by clients who have lost or forgotten their WordPress passwords or were never given admin rights to their WordPress dashboard. More often than not they are able to contact their hosting provider and I can create an administrator account from their hosting using two methods.
Creating a new WordPress admin user account via FTP or cPanel is a simple process that can be completed in just a few steps. By following our guide, you will be able to easily create a new admin user account without any hassle if you ever find yourself locked out of your website for whatever reason.
Method 1: Code
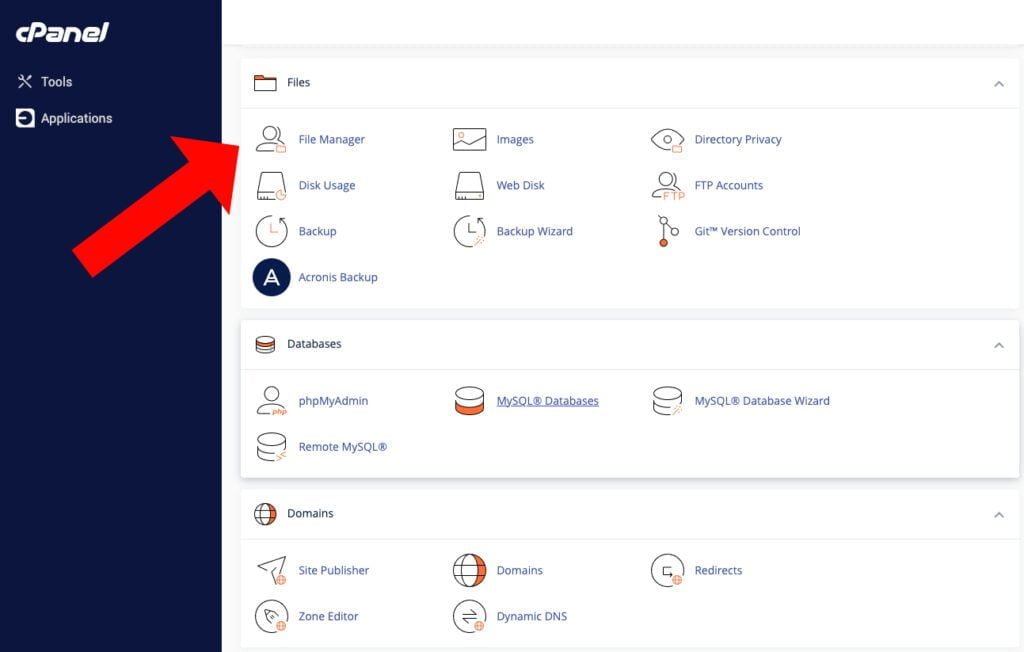
Step 1: Access your hosting panel
To create a new WordPress admin user account via cPanel, the first step is to access your hosting control panel. Login to your hosting account and navigate to the cPanel dashboard. Once you’re in, look for the ‘File Manager’ icon and click on it.
Step 2: Locate the WordPress Installation Directory
After accessing your hosting control panel, locate the WordPress installation directory on your server. This is where all your WordPress files are stored. The folder should be named ‘public_html’ and will contain folders named ‘wp-admin’ and ‘wp-content’.
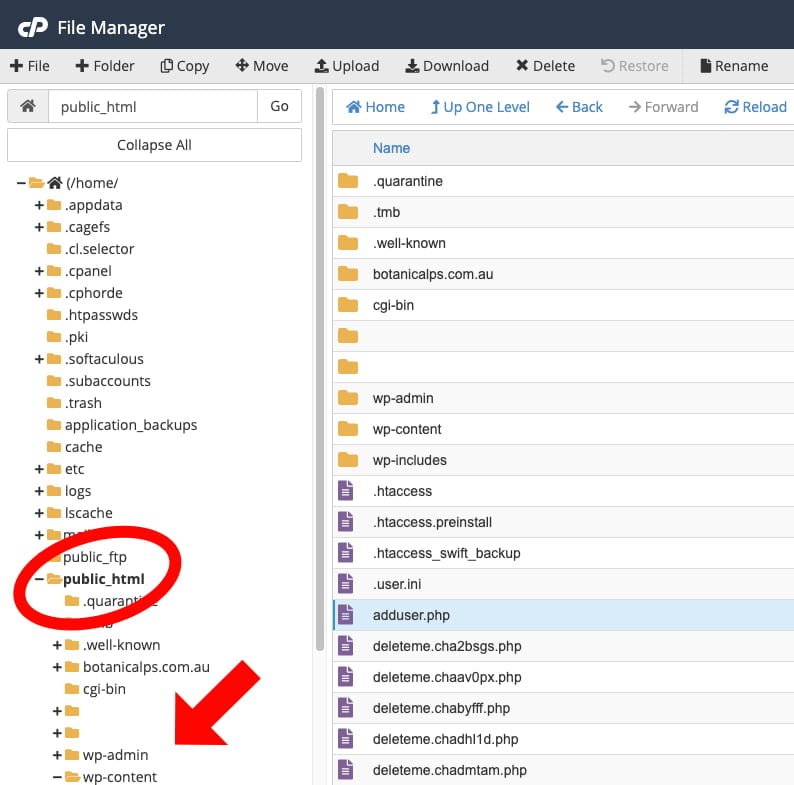
Step 3: Add a new file
Click ‘+ file’. In the pop-up box name the new file ‘adduser.php’. Now click ‘view’ to open your new file.
Step 4: Copy and paste
Paste the following code into your file.
<?php
// ADD NEW ADMIN USER TO WORDPRESS
// ----------------------------------
// Put this file in your WordPress root directory and run it from your browser.
// Delete it when you're done.

require_once('wp-blog-header.php');
require_once('wp-includes/registration.php');

// ----------------------------------------------------
// CONFIG VARIABLES
// Make sure that you set these before running the file.
$newusername = 'Username'; // here goes your username
$newpassword = 'Password'; // here goes your password
$newemail = 'name@mail.com'; // here goes your email
// ----------------------------------------------------

// This is just a security precaution, to make sure the above "Config Variables"
// have been changed from their default values.
if ( $newpassword != 'YOURPASSWORD' &&
	 $newemail != 'YOUREMAIL@TEST.com' &&
	 $newusername !='YOURUSERNAME' )
{
	// Check that user doesn't already exist
	if ( !username_exists($newusername) && !email_exists($newemail) )
	{
		// Create user and set role to administrator
		$user_id = wp_create_user( $newusername, $newpassword, $newemail);
		if ( is_int($user_id) )
		{
			$wp_user_object = new WP_User($user_id);
			$wp_user_object->set_role('administrator');
			echo 'Successfully created new admin user. Now delete this file!';
		}
		else {
			echo 'Error with wp_insert_user. No users were created.';
		}
	}
	else {
		echo 'This user or email already exists. Nothing was done.';
	}
}
else {
	echo 'Whoops, looks like you did not set a password, username, or email';
	echo 'before running the script. Set these variables and try again.';
}
Step 5: Edit the code
Find CONFIG VARIABLES within the code. Change the username, password and email address to your chosen login details. Thus the code should look something like this:
<?php
// ADD NEW ADMIN USER TO WORDPRESS
// ----------------------------------
// Put this file in your WordPress root directory and run it from your browser.
// Delete it when you're done.

require_once('wp-blog-header.php');
require_once('wp-includes/registration.php');

// ----------------------------------------------------
// CONFIG VARIABLES
// Make sure that you set these before running the file.
$newusername = 'johnsmith'; // here goes your username
$newpassword = 'pass123'; // here goes your password
$newemail = 'JohnSmith@email.com'; // here goes your email
// ----------------------------------------------------

// This is just a security precaution, to make sure the above "Config Variables"
// have been changed from their default values.
if ( $newpassword != 'YOURPASSWORD' &&
	 $newemail != 'YOUREMAIL@TEST.com' &&
	 $newusername !='YOURUSERNAME' )
{
	// Check that user doesn't already exist
	if ( !username_exists($newusername) && !email_exists($newemail) )
	{
		// Create user and set role to administrator
		$user_id = wp_create_user( $newusername, $newpassword, $newemail);
		if ( is_int($user_id) )
		{
			$wp_user_object = new WP_User($user_id);
			$wp_user_object->set_role('administrator');
			echo 'Successfully created new admin user. Now delete this file!';
		}
		else {
			echo 'Error with wp_insert_user. No users were created.';
		}
	}
	else {
		echo 'This user or email already exists. Nothing was done.';
	}
}
else {
	echo 'Whoops, looks like you did not set a password, username, or email';
	echo 'before running the script. Set these variables and try again.';
}
Step 6: Save your changes and execute!
Pretty self-explanatory. Save your changes and you can close the file.
Now go to your website in your internet browser and add the file name to the URL.
Example: https://www.yourwebsite.com/adduser.php
If you have been successful the text below will display within the browser window.

Step 7: Log in with your new WordPress admin user account
You should now be able to head on over to your standard WordPress login screen and enter your new username and password. Now that you have successfully logged in make sure you go back and delete the adduser.php file for security reasons.
Method 2: PHPMyAdmin and the SQL DataBase
Step 1: Access the hosting and open the database
Access your hosting account and navigate to the account dashboard. Locate phpMyAdmin or an option such as database management.
phpMyAdmin allows you to manage the website’s database. Open phpMyAdmin and select the database associated with your website. It will likely open to the correct one by default. If it doesn’t or you aren’t sure you can always check in the ‘wp-config.php’ file located in the WordPress installation directory.

Step 2: Locate the users database table

Locate the “wp_users” table: In the list of tables, find and click on the table named “wp_users” (the table prefix may vary depending on your WordPress installation).
Step 3: Create a new admin user
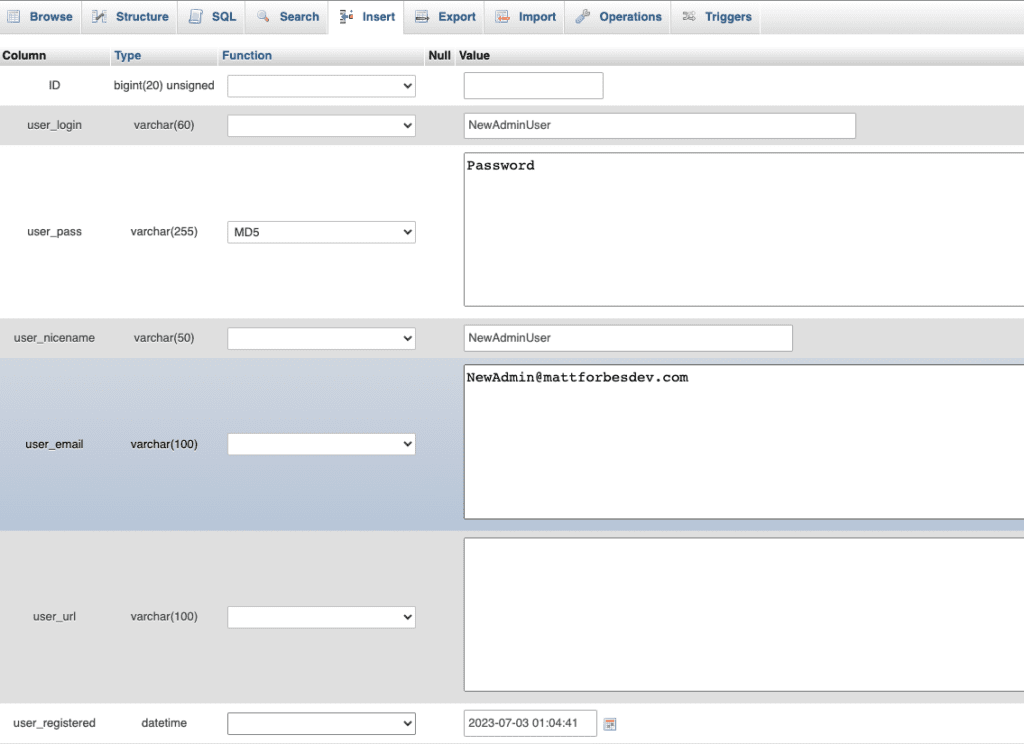
Insert a new user record: Click on the “Insert” tab within the “wp_users” table. Fill in the required fields as follows:
- ID: Leave this field blank. It should auto-increment.
- user_login: Enter the desired username for the new admin user.
- user_pass: Enter a strong password for the new admin user. Make sure to select the “MD5” function from the drop-down menu next to the password field.
- user_nicename: Enter the same username as the user_login field.
- user_email: Enter the email address associated with the new admin user.
- user_registered: Select the current date and time from the drop-down menu.
- user_status: Set this field to “0”.
- display_name: Enter the desired display name for the new admin user.
Save the new user record: Click on the “Go” or “Save” button to save the new user record in the “wp_users” table.
Step 4: Grant Admin Privileges

Assign the admin role to the newly created user. Locate the “wp_usermeta” table, click on it, and then click on the “Insert” tab. Fill in the fields as follows:
- unmeta_id: Leave this field blank. It should auto-increment.
- user_id: Enter the ID of the newly created user from the “wp_users” table.
- meta_key: Enter “wp_capabilities”.
- meta_value: Enter
a:1:{s:13:"administrator";b:1;}.
Save the usermeta record: Click on the “Go” or “Save” button to save the usermeta record in the “wp_usermeta” table.
Step 5: Log In with your admin account
Access your WordPress admin login page: Open your web browser and navigate to your WordPress admin login page, usually located at “yourdomain.com/wp-admin”.
Log in with the new admin credentials: Enter the username and password you specified when creating the new admin user.
Once logged in, you should have access to the WordPress admin dashboard with the newly created admin user.
A quick word of warning. These methods involve direct manipulation of the code and database in the backend of your website. You should always create backups and proceed with caution in the event that something goes wrong.
If you are unsure about anything mentioned in this post or your website requires maintenance. Please contact me to discuss our options.
If you progressed through this tutorial and have successfully created a new admin account via cpanel or your hosting provider then congratulations.